즐겁게, 코드
AWS S3를 활용해 이미지 서버 구축하기 - 클라이언트 편 본문
🚨 주의! 본 포스팅은 리액트 웹 어플리케이션을 기반으로 합니다.

지난 글에 이어 유저 페이지에서 프로필 사진을 지정할 수 있도록 하고, 이미지를 업로드하면 곧장 S3에 올라갈 수 있도록 합니다.
이를 구현하는 과정을 크게 [input 태그 커스텀] - [AWS SDK 연동] - [대체 이미지 설정] 단계로 나눠 설명드리겠습니다.
[1 / 3] - input 태그 커스텀
먼저 클라이언트의 파일 업로드를 위해 input[type=file] 태그를 활용합니다.
<input type="file" />그런데, 이걸 스타일하는게 아주 악랄합니다.

input[type=file]는 브라우저가 기본적으로 “파일 선택 / 선택된 파일 없음” 이라는 문구를 출력하는데요, 이게 속성을 설정한다고 해서 보이지 않는게 아니라 position: absolute 등 CSS 트릭을 활용해서 보이지 않게 해야만 합니다.
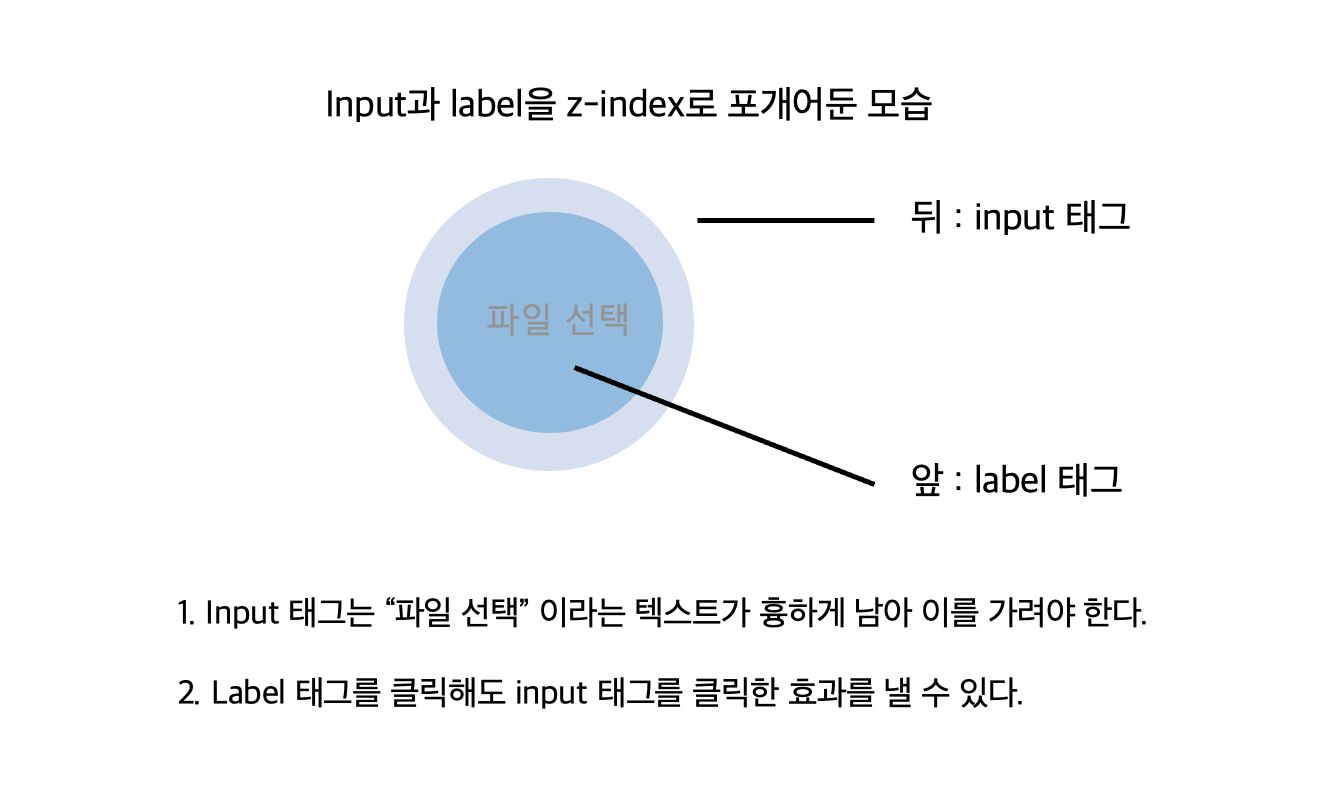
제가 사용한 방법과 팁을 공유드리자면, input 태그는 label을 클릭하는 것으로도 클릭 이벤트를 발생시킬 수 있습니다.
그래서 input 태그를 뒤에 두고, label 태그를 앞에 배치해 “파일 선택” 이라는 텍스트를 가리기로 했습니다.

<input type="file" id="upload" className="image-upload" />
<label htmlFor="upload" className="image-upload-wrapper"></label>
/* 실제 파일 업로드를 수행하는 버튼입니다. */
.image-upload {
width: 120px !important;
height: 120px !important;
font-size: 100px;
text-align: right;
min-width: 0 !important;
outline: none;
background: rgb(0, 0, 0);
cursor: inherit;
display: block !important;
border-radius: 50% !important;
cursor: pointer;
position: absolute;
margin: 0 !important;
z-index: -1;
}
.image-upload-wrapper {
position: inherit;
width: 120px !important;
height: 120px !important;
font-size: 100px;
text-align: right;
min-width: 0 !important;
outline: none;
background: rgb(255, 255, 255);
cursor: inherit;
display: block !important;
border-radius: 50% !important;
cursor: pointer;
}
이제 해당 프로필 영역을 클릭하면 이미지를 선택할 수 있습니다.input[type=file]에서 다루는 파일 객체는 이벤트 객체의 e.target.files[0] 에 저장되어 있습니다.
[2 / 3] - AWS SDK 연동하기
AWS 객체를 사용하기 위해 프로젝트 폴더에 aws-sdk 모듈을 설치합니다.
npm i aws-sdksdk 설치가 끝났다면 AWS 설정 객체를 업데이트합니다.
이 때, IdentityPoolId는 이전 글의 두 번째 단계를 참고하시면 됩니다.
import AWS from "aws-sdk"

const User = props => {
  AWS.config.update({
    region: bucketRegion, // 버킷이 존재하는 리전을 문자열로 입력합니다. (Ex. "ap-northeast-2")
    credentials: new AWS.CognitoIdentityCredentials({
      IdentityPoolId: IdentityPoolId, // cognito 인증 풀에서 받아온 키를 문자열로 입력합니다. (Ex. "ap-northeast-2...")
    }),
  })

  return (
    <>
      <input type="file" id="upload" className="image-upload" />
      <label htmlFor="upload" className="image-upload-wrapper"></label>
    </>
  )
}
이전 글의 AWS 환경을 잘 따라왔다면, S3에 접근할 수 있는 상태가 되었습니다.
이제 파일을 선택하면 S3에 업로드할 수 있도록 input[type=file]의 콜백 함수를 작성하겠습니다.
const handleFileInput = e => {
  // input 태그를 통해 선택한 파일 객체
  const file = e.target.files[0]

  // S3 SDK에 내장된 업로드 함수
  const upload = new AWS.S3.ManagedUpload({
    params: {
      Bucket: [S3 버킷명], // 업로드할 대상 버킷명
      Key: [파일명] + ".jpg", // 업로드할 파일명 (* 확장자를 추가해야 합니다!)
      Body: file, // 업로드할 파일 객체
    },
  })

  const promise = upload.promise()

  promise.then(
    function (data) {
      alert("이미지 업로드에 성공했습니다.")
    },
    function (err) {
      return alert("오류가 발생했습니다: ", err.message)
    }
  )
}
이제 코드를 합쳐 보겠습니다.
import AWS from "aws-sdk"

const User = props => {
  AWS.config.update({
    region: bucketRegion,
    credentials: new AWS.CognitoIdentityCredentials({
      IdentityPoolId: IdentityPoolId
    }),
  })

  const handleFileInput = e => {
  const file = e.target.files[0]

  const upload = new AWS.S3.ManagedUpload({
    params: {
      Bucket: [S3 버킷명],
      Key: [파일명] + ".jpg",
      Body: file,
    },
  })

  const promise = upload.promise()

  promise.then(
    function (data) {
      alert("이미지 업로드에 성공했습니다.")
    },
    function (err) {
      return alert("오류가 발생했습니다: ", err.message)
    }
  )
}

  return (
    <>
      <input type="file" id="upload" className="image-upload" onChange = {handleFileInput} />
      <label htmlFor="upload" className="image-upload-wrapper"></label>
    </>
  )
}
이제 파일을 선택하면 버킷에 이미지가 추가된 것을 확인할 수 있습니다.

[3 / 3] - 이미지 불러오기 & 대체 이미지 설정
이제 업로드한 이미지를 활용해 보겠습니다.
이전 글에서 S3 버킷을 퍼블릭으로 설정하면 이미지를 외부에서 접근할 수 있다고 소개했습니다.

이를 이용해, img[src=""] 를 활용해 버킷의 이미지를 가져다가 쓰겠습니다.
<input
  type="file"
  id="upload"
  className="image-upload"
  onChange="{handleFileInput}"
/>
<label htmlFor="upload" className="image-upload-wrapper">
  <img className="profile-img"
  src={`https://[버킷명].s3.ap-northeast-2.amazonaws.com/[파일명].jpg`}/>
</label>
/* 이미지를 꾸미는 CSS */
.profile-img {
position: inherit;
width: 120px !important;
height: 120px !important;
font-size: 100px;
min-width: 0 !important;
outline: none;
cursor: inherit;
display: block !important;
border-radius: 50% !important;
cursor: pointer;
}이제 업로드한 이미지를 가져다가 사용할 수 있습니다.

그러나, 만약 찾는 이미지가 없다면 이미지가 이렇게 깨지게 됩니다.

이를 위해서는 onError 라는 프로퍼티를 활용합니다.useRef를 통해 이미지 태그의 DOM을 직접 지정한 뒤, 이미지를 버킷에서 불러오는데 실패하면 이미지의 소스를 대체 이미지로 변경하는 수법입니다. (제가 생각해낸 방법이지만, 교활하게(?) 잘 처리했다고 생각합니다 😅)
import { useRef } from "react"


const User = () => {
    const imgRef = useRef(null)
    // ... 생략
    return (
        <img
        className="profile-img"
        ref={imgRef}
        src={`https://[버킷명].s3.ap-northeast-2.amazonaws.com/[파일명].jpg`}/>
        onError={() => {
            return (imgRef.current.src =
            "https://대체 이미지 링크")
        }}
        />
    )
}
이렇게 함으로써 찾는 유저의 프로필이 없다면 대체 이미지를 보여줄 수 있었습니다.

💻 전체 코드는 아래와 같습니다.
import {useRef} from "React"
import AWS from "aws-sdk"

const User = props => {

  const imgRef = useRef(null)
  // Cognito 연동으로 S3 접근 권한을 얻는 부분
  AWS.config.update({
    region: bucketRegion,
    credentials: new AWS.CognitoIdentityCredentials({
      IdentityPoolId: IdentityPoolId
    }),
  })

  const handleFileInput = e => {
    const file = e.target.files[0]

    // AWS sdk에 포함된 함수로 파일을 업로드하는 부분
    const upload = new AWS.S3.ManagedUpload({
        params: {
        Bucket: [S3 버킷명],
        Key: [파일명] + ".jpg",
        Body: file,
        },
    })

    const promise = upload.promise()

    promise.then(
        function (data) {
        alert("이미지 업로드에 성공했습니다.")
        },
        function (err) {
        return alert("오류가 발생했습니다: ", err.message)
        }
    )
}

  return (
    <>
      <input type="file" id="upload" className="image-upload" onChange = {handleFileInput} />
      <label htmlFor="upload" className="image-upload-wrapper">
         <img
        className="profile-img"
        ref={imgRef}
        src={`https://[버킷명].s3.ap-northeast-2.amazonaws.com/[파일명].jpg`}/>
        onError={() => {
            return (imgRef.current.src =
            "https://대체 이미지 링크")
        }}
        />
      </label>
    </>
  )
}
'☁️ 클라우드 > AWS' 카테고리의 다른 글
| 프라이빗 클라우드 구축하기 - VPC란 무엇인가 (0) | 2022.04.06 |
|---|---|
| EC2 배치 그룹 알아보기 (0) | 2022.04.03 |
| AWS S3를 활용해 이미지 서버 구축하기 - AWS 설정 편 (3) | 2021.05.18 |
| dynamodb 이슈 (0) | 2021.03.02 |
| AWS CLI & Lambda 로 서버리스 백엔드 구축하기 (0) | 2021.01.06 |


